
The Income Tax Department has issued 7 different types of ITR forms to categorise taxpayers based on their source of income, residential status, and a few other factors. Let us understand the eligibility of filing ITR 2 and how to file it online.
Who can file ITR 2?
The ITR 2 is a form that can be filed by individuals and HUFs who are Residents (ROR/RNOR) or non-residents earning income from the following sources:
Note: Total income from these sources can exceed Rs. 50 lakhs
- Income from Salary or Pension.
- Income from House Property (Can be more than one house property).
- Income from Capital Gains/ loss on sale of investments/property (both short-term and long-term).
- Income from Other Sources (Including winnings from the lottery and income from owning and maintaining racehorses).
- Income from Foreign Assets/ Other foreign income.
- Agricultural income of more than Rs 5,000.
- Individuals holding unlisted equity shares.
- A person who is a director in a company.
- Income where clubbing provision is applicable.
- Individuals having assets located outside India, which includes any signing authority for accounts held outside India.
- One who desires to carry forward or brought forward loss under income from house property.
- Any tax has been deducted under Section 194N.
- In case payment or deduction of tax has been deferred on ESOP.
Who cannot file ITR 2?
- Individual or HUF who earns income from business or profession in the form of salary, bonus, or interest.
- Income received by an individual from a partnership firm.
- Individuals who are eligible for the ITR-1 Form.
What documents are required to file ITR 2?
- For salaried individuals, Form 16 is issued by the employer.
- Form 16A issued by the deductor i.e., TDS certificates for the TDS deducted on the interest over fixed deposits or savings account.
- From 26AS for TDS on salary or other income. This form is available on the e-filling portal.
- Rent Receipts for calculation of HRA (Only if you hadn’t submitted the same to your employer)
- Balance Sheet, P&L Account Statement, and other Audit Reports if applicable.
- Bank Statement, Fixed Deposit Receipts (FDRs)
- For claiming tax saving deductions u/s 80C, 80D, 80G, and 80GG, you will need insurance receipts, donation receipts, rent receipts, tuition fees receipts, etc., if they were not included in Form 16.
- A copy of last year’s tax return
Process of filing ITR 2 online
You can file your ITR online on the official government e-filing website:
But before that, you need to get a few things done in order to ensure a smooth and easy ITR filing such as:
- Register yourself with a valid username and password.
- Make sure that the status of your PAN is active.
- Link your PAN card with your Aadhar card.
- Pre-validate your bank account.
- Use a verified mobile number associated with your bank, NSDL, CDSL, Aadhar, or e-Filing portal (for e-Verification).
- Download the offline utility or use third-party software (If using offline mode).
Now, let’s go through the steps of filing your ITR 2
Step 1:
Go to the official e-filing website: https://www.incometax.gov.in/IEC/FOPORTAL
And login with your credentials.
Your User ID is your PAN number. Once you enter your PAN, click on continue.
Select “PLEASE CONFIRM YOUR SECURE ACCESS MESSAGE” and enter your Password.
In case you forget your password, you can reset it by clicking on FORGOT PASSWORD and generating an OTP to proceed with your login process.

Step 2:
Once you log in, you will get your basic profile details on the left side, and on the right side, you will get the option to click on FILE YOUR RETURN FOR THE YEAR ENDED ON 31-MAR-2023. You can start by clicking on the FILE NOW button.

Step 3:
Select the Assessment Year as “2023-24”, and the Mode of filing returns as “ONLINE” and Click on Continue to proceed further.

Now click on “START NEW FILING” and select the applicable status to proceed.
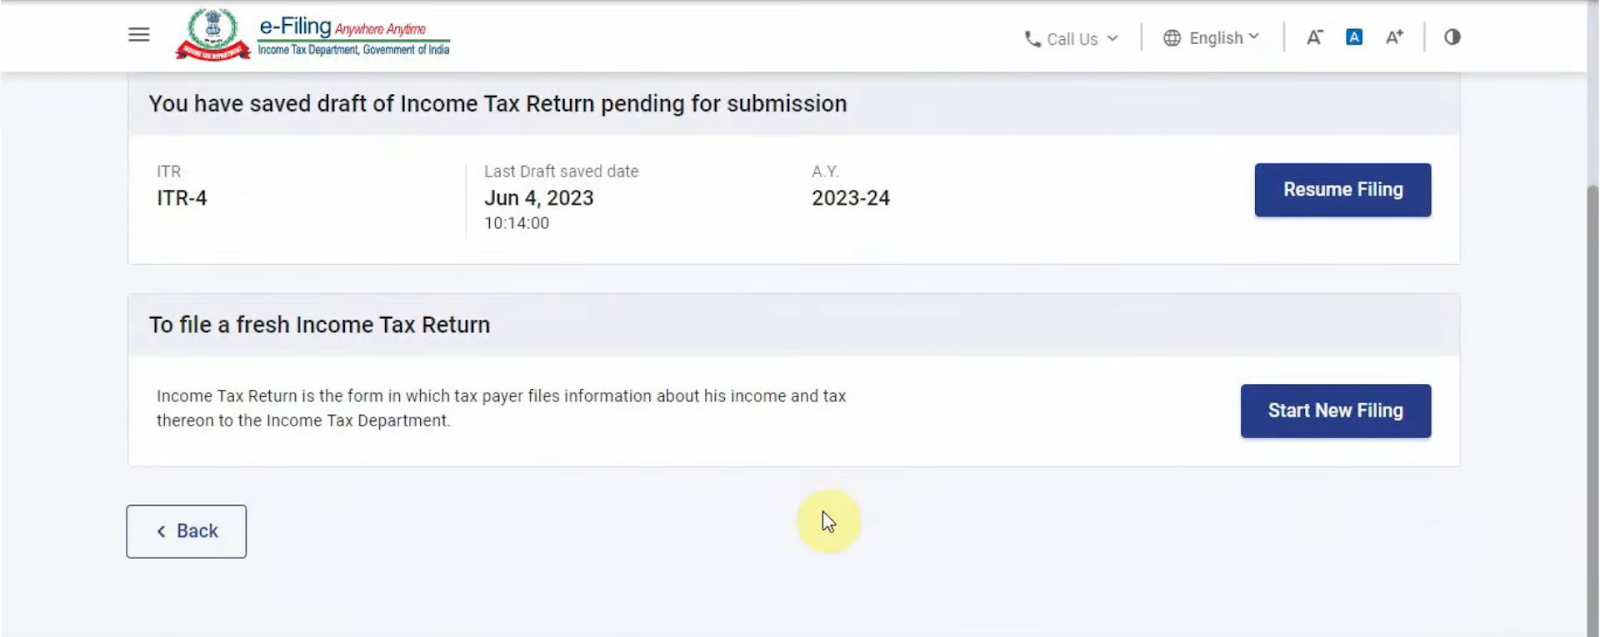
For this example, let’s select Individual and continue.
Step 4:
Now you will need to choose the relevant ITR form. Here you need to select ITR 2 and click on Proceed.
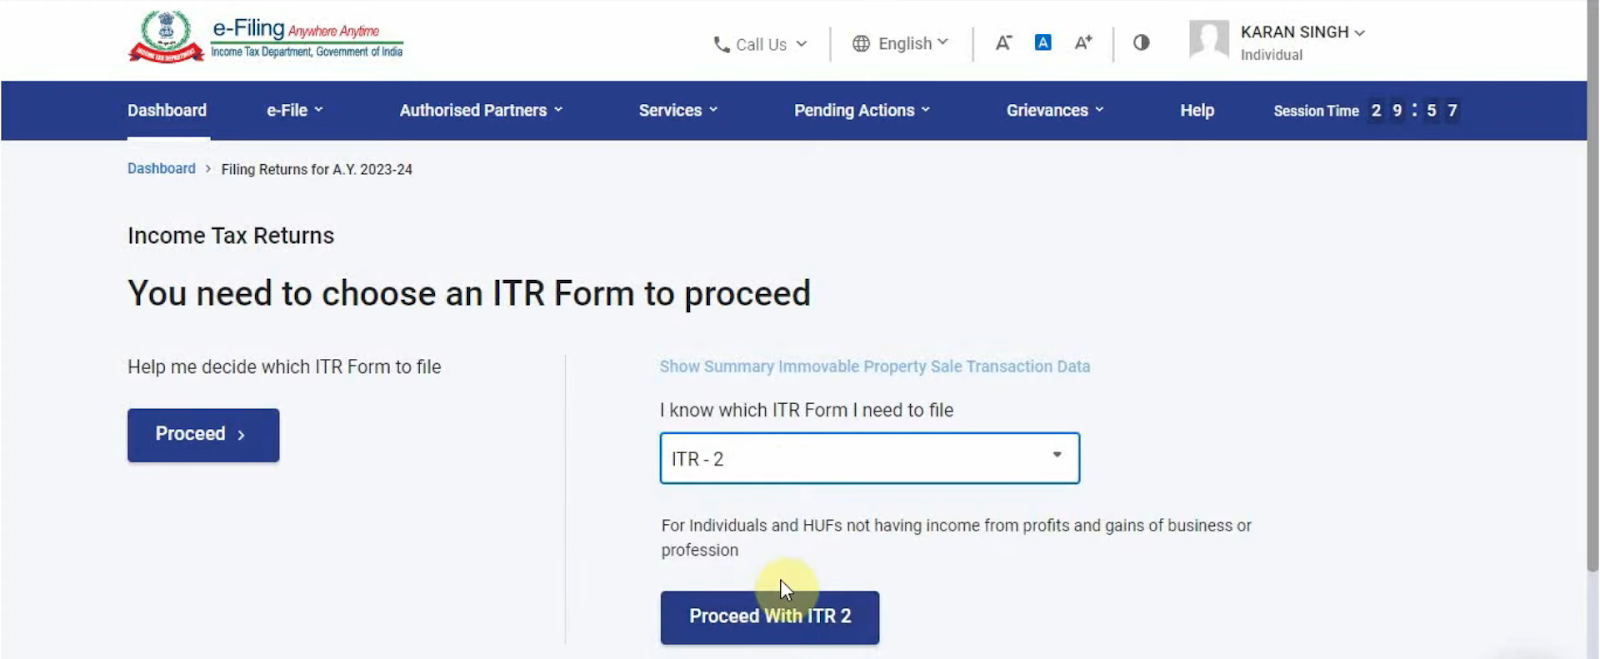
Next, you need to click on “Let’s Get Started”

Step 5:
Here you will have to answer a few questions to proceed.
Select “Taxable Income is more than basic exemption limit” & click on Continue.

Step 6:
To proceed with filing your general information, select Schedule Part A. Similarly select all the relevant schedules in the remaining categories, i.e., income, deduction, tax, and others.

Once you have selected all the relevant schedules, click on continue. Now, a dialogue box will appear. Select continue again.

A new page will open stating the number of schedules you have selected. Here you have to click on continue once again.

Step 7:
If you want to opt for the new tax regime, select no and continue.

Now, you will be asked a few questions regarding salary exemption. Enter the details if any.
If you don’t have any exemptions, scroll down and click on continue.

Next, you can enter the details of any deductions that you are eligible to claim and select continue.

Step 8:
You need to select Part A – General information

First, enter your personal details and then update your filing status. Most of the information will be auto-filled.

Select your residential status and the condition of your status. Fill in the remaining details and click on save.

Step 9:
Once you completed your filing status information, enter your bank details. Select nominated for refund and click on confirm.

Step 10:
After confirming your general information, click on Schedule salary

In the gross salary section click on add. Here you need to add the details of your employer. Moreover, if your TDS had been deducted, you need to enter the TAN number.
Then, select the basic salary option and enter your annual salary amount.

If you have any other perquisites, enter the details. Otherwise, click on delete.
Scroll down and click on add.

Apart from that you can enter the details of allowances if any. Once you filled in all the necessary information, click on confirm.

Step 11:
Now, go to schedule capital gains.And select the relevant options and click on continue (In case of income from share capital, click on the 2nd and 3rd options)


First, you need to add short-term capital gains. So, click on add details.

Further, select Section 111A and enter the full value of consideration, cost of acquisition, and expenditure.
Step 12:
Now, you need to add short-term capital gains. So, click on add details and select view schedule 112A.

Select add details.

Please note that if you have acquired shares on or before 31st January 2018, you will have to enter the details of each share. But if you acquired the share after 31st January 2018, then you can enter the consolidated amount.
Enter the amount and click on add.

Check your short-term capital and long-term capital amount and click on confirm.
Step 13:
The next section is Schedule VDA. This is for people who have invested in cryptocurrency.
If you have invested in crypto, select this schedule and add the required details. Once you are done entering all the information, select confirm.
Step 14:
Now, you need to add income from other sources.
So, under gross income chargeable to tax at normal applicable rates, click on add details.

Select the nature of income as interest and enter the amount. Also, note that if whatever interest amount you are entering here, you need to mention it under section 80TTA as well.

Once done, click on add.
Similarly, if you have income go to any other income and select add details.

Step 15:
Schedule CYLA and Schedule BFLA are not applicable to you. So, open Schedule CYLA and confirm it. Then, open Schedule BFLA and select compute set off, and continue.
Do the same thing for Schedule CFL and Schedule Special Income.
Step 16:
In Schedule VIA, you have to mention Section 80TTA and other relevant deductions. After entering the amount, click on confirm. Make sure to confirm any other schedules that you have selected.
Step 17:
Click on the computation of tax on total income

If your taxable amount is below Rs. 12,500, you can claim a rebate. But if your taxable amount is above Rs. 12,500, then you are liable to pay tax.
Lastly, if you are holding any assets outside India, click on yes. If not, click on no and then go to preview return.

Step 18:
Once you get the preview, select Proceed to Validation.
At this stage, you will get a list of errors that you may have made. Make sure to fill in any incomplete information or provide the bifurcation wherever required. After clearing all the errors, proceed to validation once again.
If you get the validation successful message, your next step is to Proceed to verification.

Step 19:
Click on e-verify and continue

Then select the 1st option, i.e., I would like to verify using OTP on a mobile number registered with Aadhar.

Click on continue and generate the OTP.
Step 20:
Enter the OTP and select submit.

Conclusion:
Filing your ITR is an important responsibility and we hope that if you are eligible to file ITR 2, this step-by-step comprehensive blog has cleared all your doubts regarding ITR filing. For more assistance connect with a tax expert and get your ITR filed before 31st July 2023.
Related Posts
Stay up-to-date with the latest information.

